00 Min. Lesezeit
Imagine you've just put the finishing touches on your latest application. Now comes the challenging part: deploying it on Google Cloud's Compute Engine instances. The initial setup is like assembling a complex jigsaw puzzle: creating a Managed Instance Group (MIG) with auto-scaling and auto-healing, pushing your dockerized application to Artifact Registry, configuring URL maps, forwarding rules, backends, and finally, a load balancer to distribute traffic.
In the current landscape of software development, while automating code improvement remains a challenge, optimizing infrastructure management for code updates is achievable. With the involvement of iterative development methodologies, it's crucial to minimize the time and effort required for code deployment.
This blog introduces and executes an efficient Continuous Deployment (CD) pipeline leveraging Git triggers on Cloud Build within Google Cloud Platform (GCP). My approach integrates SSH key authentication, enhancing both security and automation. We'll explore how to set up a Git trigger that activates whenever changes are pushed to your repository. We'll dive into configuring Cloud Build to work with these triggers, incorporating crucial security elements like Secret Manager for handling sensitive credentials, setting up GitHub SSH keys for secure, and also setting up SSH keys to maintain secure access of your deployment on your GCP infrastructure and thus lead to seamless integration.
These steps eliminate the need for repetitive infrastructure setup with each code iteration, significantly reducing deployment overhead and enabling rapid, secure updates to your production environment.
Before jumping into the implementation, let's understand the concept of Continuous Deployment (CD) in the context of Git-based version control. CD is a DevOps practice where code changes are automatically built, tested, and deployed to production environments automatically. In the Google Cloud Platform (GCP) ecosystem, Cloud Build serves as a robust CI/CD tool that can ingest source code from diverse Version Control Systems (VCS) or cloud storage solutions, execute builds according to user-defined specifications, and generate deployment artifacts such as Docker images or Java ARchives (JARs).
Let's dive into setting up the whole CD pipeline now;
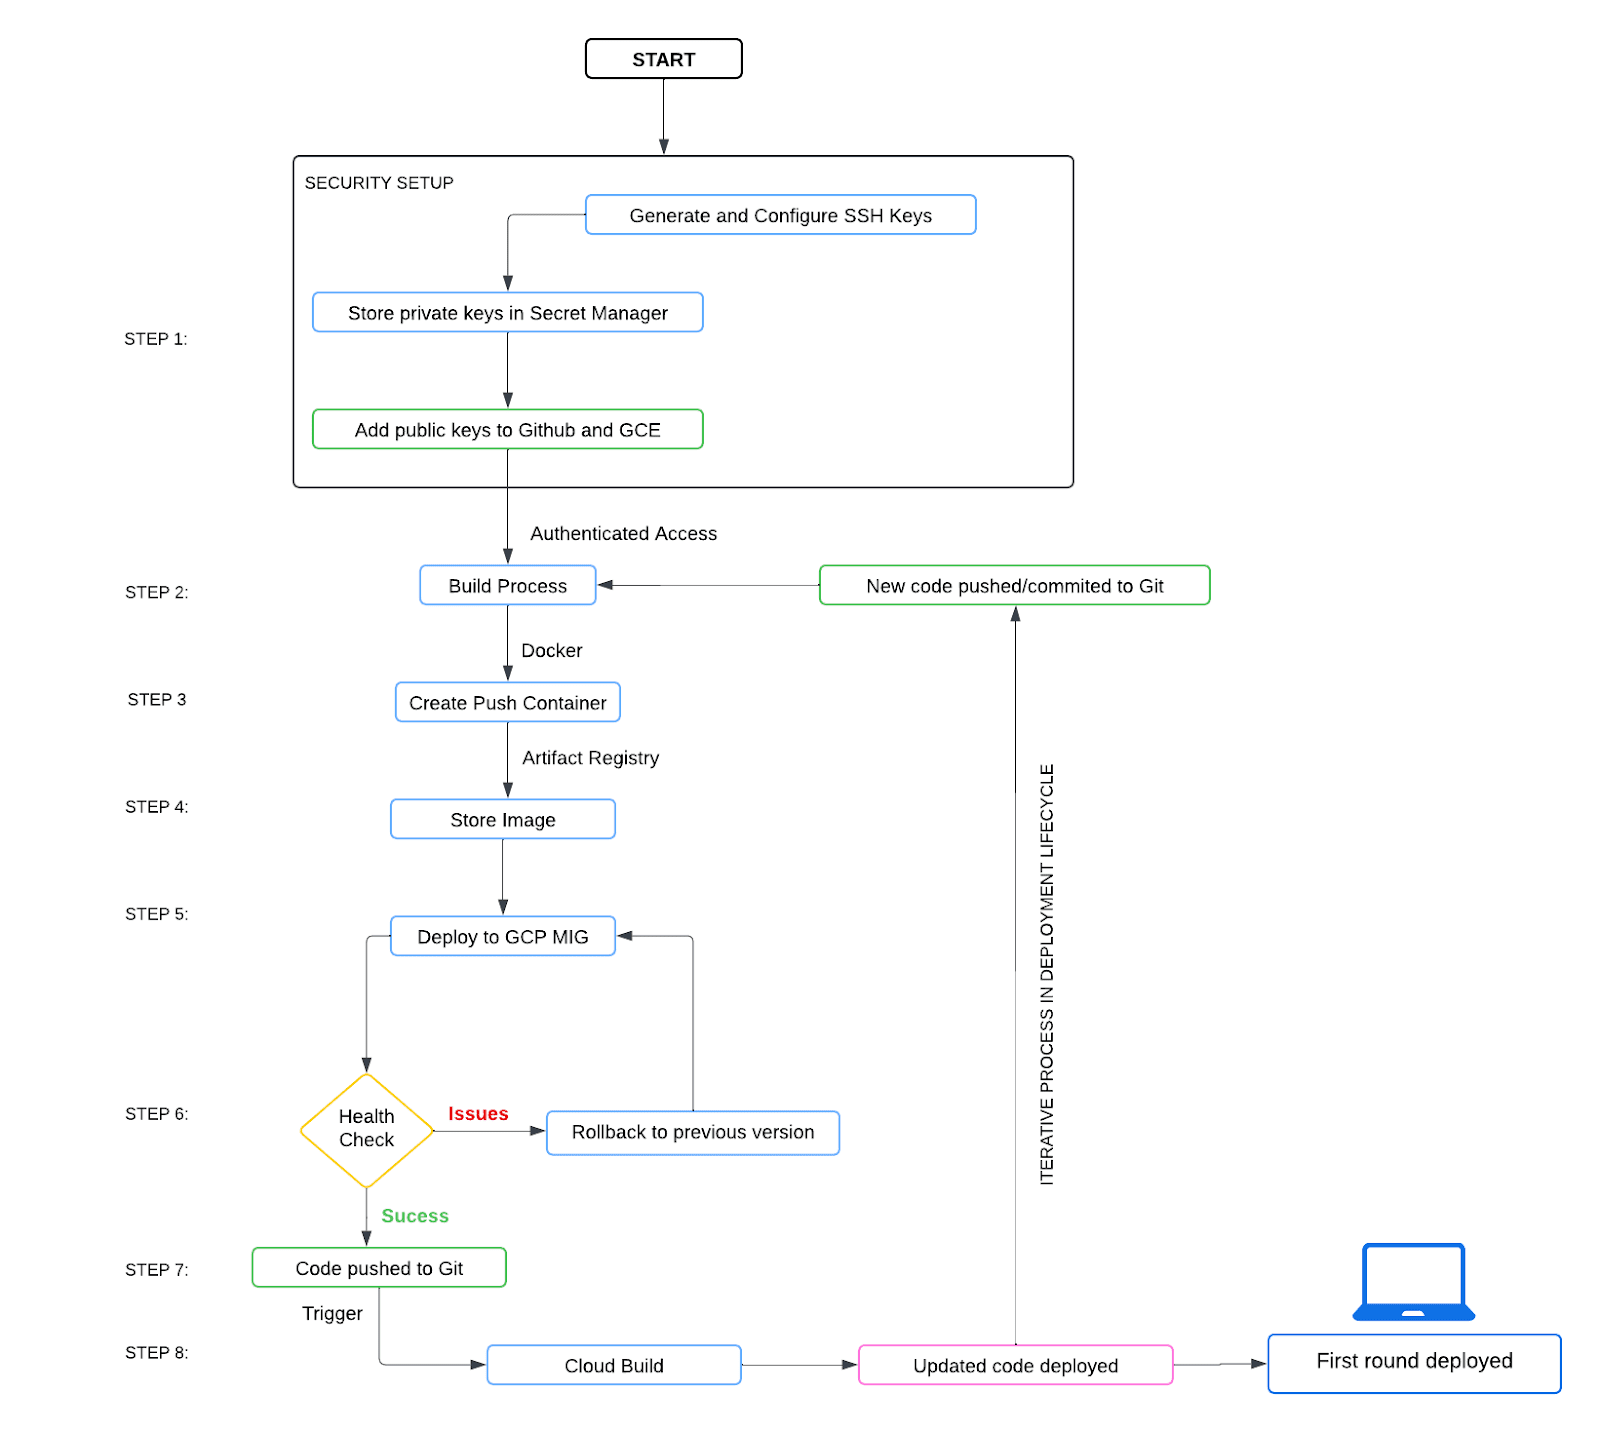
To implement GitHub triggers effectively, the initial step involves properly structuring and updating your repository with the latest codebase. It's absolutely necessary that the person configuring the Cloud Build trigger possesses the requisite permissions on the target repository. Specifically, they should have collaborator status or equivalent access rights to enable seamless integration between GitHub events and the deployment pipeline. This ensures that the CD system can respond to repository updates and initiate the deployment process. The flowchart below is an overview of the steps we will be learning and practicing today.
If you are already familiar with all the services, go ahead and complete your deployment using this diagram.
Before proceeding with the setup, ensure that the Cloud Build API and the Secret Manager API are enabled in your Google Cloud environment. These can be activated via the Google Cloud Console's API Marketplace.
Establishing GitHub SSH keys for secure repository connection
For this, open up your cloud shell on your console and wait for it to connect. Now type in the following commands:
mkdir workingdir && cd workingdir
To generate your github key run this line replace the github-email with the email id that you have used to create your repository on Github
ssh-keygen -t rsa -b 4096 -N '' -f id_github -C github-email
This generates a 4096-bit RSA key pair without a passphrase, which is crucial, as Cloud Build doesn't support passphrase-protected keys.
Secure Private Key Storage on Secret Manager
Now after the above steps you would have a private and a public Github key. The private key (id_github) must be securely stored in Secret Manager to prevent unauthorized access. To do so follow these steps:
a. Navigate to the Secret Manager in Google Cloud Console.
b. Select 'Create Secret'.
c. Assign a descriptive name to the secret.
d. For the secret value, upload the 'id_github' file from your workingdir.
e. Maintain default region settings unless specific requirements dictate otherwise.
f. Finalize by clicking 'Create secret'
Once these steps are done you can be assured that your private key is protected and isn’t accessible to everyone.
Connecting to your Github repository
Now that you have your Git keys it is necessary to add the public key on GitHub so as to connect it to your infrastructure on GCP. So log into your GitHub account move into your repository page and follow these steps:
a. Move to the Settings tab of your repository
c. In the sidebar, select 'Deploy Keys' and click 'Add deploy key'.
d. Provide a descriptive title and paste the contents of 'workingdir/id_github.pub'. This is your public key
e. Enable 'Allow write access'.
f. Confirm by clicking 'Add key'.
Once you have added the Git keys to the Secret manager and your GitHub repository Access key section you can continue and remove the local copies. This adds another level of security and makes sure nobody else is able to access your GitHub key. To do so run this on your cloud shell:
rm id_github*
Configuring Cloud Build Service Account Permissions
Now that you have the above set you need to make sure that the Service Account that you are using has access to the Secret Manager.
a. Navigate to the Cloud Build Settings page in Google Cloud Console.
b. Select the service account for your build operations.
c. Enable the 'Secret Manager Secret Assessor' role for this account.
Preparing Known Hosts for GitHub
The 'known_hosts' file is a critical component of SSH security, playing a vital role in preventing man-in-the-middle (MITM) attacks. Therefore, the final step is to set up your known hosts file.
We save the GitHub public key for SSH verification in the known_hosts file. Go ahead use this command and create a known_hosts file in the working directory
ssh-keyscan -t rsa github.com > known_hosts.github
Make sure to download the 'known_hosts.github' file to the appropriate location in the build environment, in this case your Github repository.
With the GitHub SSH keys properly configured and securely stored, the next critical step is to create your cloudbuild.yaml configuration file. This YAML file defines the series of steps Cloud Build will execute during the deployment process.
For deploying applications to Compute Engine instances via SSH, it's imperative to set up authentication keys with the appropriate access permissions. These keys will enable Cloud Build to securely push code and execute commands on your Compute Engine Managed Instance Groups (MIGs).
In the next section, we'll delve into the details of setting up these SSH keys for Compute Engine. This final piece will complete our Continuous Deployment (CD) pipeline, enabling automated deployments to Compute Engine MIGs via SSH.
Configuring SSH keys for secure access to Compute Engine instances
This step is crucial for ensuring that our Cloud Build processes can securely interact with our deployment targets. Let's walk through this process, addressing common pitfalls and best practices along the way.
1. Generating SSH Keys
Create a folder named ssh_keys on your Cloud Editor. Inside that, create a blank text file called id_rsa.txt. This is where your SSH keys will be stored: both public and private.
Let's start by generating the SSH keys. Replace the italics values in the command below and run it on your cloud shell.
ssh-keygen -t rsa -f ~/enter_path_to_id_rsa.txt -C your_username -b 2048
The addition of 2048 generates a 2048-bit RSA key pair, which offers a good balance of security and performance.
2. Enter into your instance through the shell through the following command. Now the changes and the directories of files you make will all be saved in your instance memory. Make sure that you have allotted enough memory during instance formation or MIG template formation.
gcloud compute ssh username@instance_name --zone instance_zone
3. Adding SSH Keys to Compute Engine Metadata
Once you have your key pair, you need to add the public key to your Compute Engine instance's metadata. This allows you to access the SSH on that particular instance.This can be done using the following gcloud command paste this on the:
gcloud compute instances add-metadata instance_name \
--metadata ssh-keys="username:$(location_of_public_key/id_rsa.pub)" \
--zone instance_zone \
--project project_id
Replace the name of the instance with your compute engine instance name, followed by your username, location of public key, zone in which the instance is created and finally your project id.
4. Configuring the Instance for SSH Access
Now that you have added the public key to your instance metadata, in order to access the instance you would need to add the private key in the authorized_keys file in the instance ssh folder. This private key is verified with your public key from the metadata to give access to the ssh and further processing.
On your Compute Engine instance paste the following commands to set up the authorized_keys file:
mkdir -p ~/.ssh
nano ~/.ssh/authorized_keys
The nano command opens an editor. Paste your key in this file and then save it accordingly.
Next, let's set up the correct permissions for the keys, paste these commands in the shell:
chmod 700 ~/.ssh
chmod 600 ~/.ssh/authorized_keys
These permissions are crucial for security - SSH will refuse to work if the permissions are too open.
5. Testing Your SSH Connection
Once you have executed all the above steps your SSH connection should be set. You can test your SSH connection using the verbose flag to diagnose any issues:
ssh -v -i ~/ssh_keys/id_rsa username@external_ip_of_instance
Diese Schritte führen zur Fertigstellung Ihres CD-Setups, und Sie können Ihren Code von GitHub nahtlos in Ihre Produktionsumgebung integrieren.
Bevor Sie vollständig startklar sind, stellen Sie sicher, dass Docker korrekt auf Ihrer Instanz installiert ist und läuft. Ein häufiges Problem bei der Arbeit mit Docker sind Authentifizierungsfehler.
HÄUFIGES PROBLEM
Wenn Sie beim Abrufen von Docker-Images Fehler wie 'Unauthenticated request' erhalten, müssen Sie möglicherweise die entsprechenden IAM-Rollen hinzufügen. Führen Sie dazu diesen Befehl aus:
gcloud projects add-iam-policy-binding project_id \
--member=serviceAccount:service_account_name\
--role=roles/artifactregistry.reader
Konfigurieren Sie Docker außerdem für die Authentifizierung mit GCR:
gcloud auth configure-docker gcr.io --quiet
Mit diesen Schritten ist Ihre Deployment-Pipeline zusammen mit der Continuous-Deployment-Pipeline einsatzbereit, und Sie können Updates direkt von GitHub nahtlos in Ihre Produktionsumgebung auf der Google Cloud Platform integrieren.
Es kann vorkommen, dass der gerade bereitgestellte Produktionscode trotz mehrfacher Überprüfung fehlschlägt und Sie zur vorherigen Version zurückkehren möchten. Dies lässt sich mit der Rollback-Methode beheben, bei der Sie zu einer früheren Version Ihres bereitgestellten Codes zurückkehren können. Dazu haben Sie eine Option über die Konsole, wo Sie ein Rollback auswählen können. Wenn Sie jedoch die Shell verwenden und den Vorgang dort ausführen möchten, folgen Sie diesem Befehl und ersetzen Sie ihn durch die korrekten Variablen.
gcloud deploy targets rollback TARGET_NAME \ --delivery-pipeline= PIPELINE_NAME \ --release= RELEASE_NAME \ --rollout-id= ROLLOUT_ID
Stellen Sie dabei sicher, dass die Bereitstellung von fehlerhaftem Code in der Produktion zu erheblichen Ausfallzeiten Ihrer Anwendung sowie zu Datenverlust führen kann. Vergewissern Sie sich daher, dass Ihr Code vollständig getestet ist und reibungslos unter Last läuft, bevor Sie ihn in die Produktion überführen.
Fazit
Die Bereitstellung von Anwendungen auf Google Cloud mit einer sicheren und automatisierten CD-Pipeline ist mehr als nur eine technische Errungenschaft – sie ist ein Schritt hin zu einer optimierten, effizienten Entwicklung. Durch die sorgfältige Konfiguration von SSH-Schlüsseln und die Nutzung von Git-Triggern gewährleisten Sie nicht nur die Integrität Ihres Bereitstellungsprozesses, sondern auch die Geschwindigkeit und Zuverlässigkeit Ihrer Updates. Dieser Ansatz eliminiert manuelle Fehler, reduziert den Betriebsaufwand und beschleunigt die Bereitstellung neuer Funktionen in der Produktion.
Während Sie Ihre Cloud-Infrastruktur weiter verfeinern, werden die Erkenntnisse aus der Einrichtung dieser Pipeline – wie die Absicherung von Anmeldeinformationen mit Secret Manager und die Optimierung Ihrer GitHub-Integration – als solides Fundament dienen. Mit diesem Setup halten Sie nicht nur mit der schnelllebigen Welt von DevOps Schritt; Sie übernehmen die Führung auf dem Weg in eine sicherere, automatisierte Zukunft.
Ihr Projekt auf Google Cloud bereitstellen: Vom manuellen Setup zur automatisierten CD-Pipeline mit sicherer Git-Integration

Imagine you've just put the finishing touches on your latest application. Now comes the challenging part: deploying it on Google Cloud's Compute Engine instances. The initial setup is like assembling a complex jigsaw puzzle: creating a Managed Instance Group (MIG) with auto-scaling and auto-healing, pushing your dockerized application to Artifact Registry, configuring URL maps, forwarding rules, backends, and finally, a load balancer to distribute traffic.
In the current landscape of software development, while automating code improvement remains a challenge, optimizing infrastructure management for code updates is achievable. With the involvement of iterative development methodologies, it's crucial to minimize the time and effort required for code deployment.
This blog introduces and executes an efficient Continuous Deployment (CD) pipeline leveraging Git triggers on Cloud Build within Google Cloud Platform (GCP). My approach integrates SSH key authentication, enhancing both security and automation. We'll explore how to set up a Git trigger that activates whenever changes are pushed to your repository. We'll dive into configuring Cloud Build to work with these triggers, incorporating crucial security elements like Secret Manager for handling sensitive credentials, setting up GitHub SSH keys for secure, and also setting up SSH keys to maintain secure access of your deployment on your GCP infrastructure and thus lead to seamless integration.
These steps eliminate the need for repetitive infrastructure setup with each code iteration, significantly reducing deployment overhead and enabling rapid, secure updates to your production environment.
Before jumping into the implementation, let's understand the concept of Continuous Deployment (CD) in the context of Git-based version control. CD is a DevOps practice where code changes are automatically built, tested, and deployed to production environments automatically. In the Google Cloud Platform (GCP) ecosystem, Cloud Build serves as a robust CI/CD tool that can ingest source code from diverse Version Control Systems (VCS) or cloud storage solutions, execute builds according to user-defined specifications, and generate deployment artifacts such as Docker images or Java ARchives (JARs).
Let's dive into setting up the whole CD pipeline now;
To implement GitHub triggers effectively, the initial step involves properly structuring and updating your repository with the latest codebase. It's absolutely necessary that the person configuring the Cloud Build trigger possesses the requisite permissions on the target repository. Specifically, they should have collaborator status or equivalent access rights to enable seamless integration between GitHub events and the deployment pipeline. This ensures that the CD system can respond to repository updates and initiate the deployment process. The flowchart below is an overview of the steps we will be learning and practicing today.
If you are already familiar with all the services, go ahead and complete your deployment using this diagram.
Before proceeding with the setup, ensure that the Cloud Build API and the Secret Manager API are enabled in your Google Cloud environment. These can be activated via the Google Cloud Console's API Marketplace.
Establishing GitHub SSH keys for secure repository connection
For this, open up your cloud shell on your console and wait for it to connect. Now type in the following commands:
mkdir workingdir && cd workingdir
To generate your github key run this line replace the github-email with the email id that you have used to create your repository on Github
ssh-keygen -t rsa -b 4096 -N '' -f id_github -C github-email
This generates a 4096-bit RSA key pair without a passphrase, which is crucial, as Cloud Build doesn't support passphrase-protected keys.
Secure Private Key Storage on Secret Manager
Now after the above steps you would have a private and a public Github key. The private key (id_github) must be securely stored in Secret Manager to prevent unauthorized access. To do so follow these steps:
a. Navigate to the Secret Manager in Google Cloud Console.
b. Select 'Create Secret'.
c. Assign a descriptive name to the secret.
d. For the secret value, upload the 'id_github' file from your workingdir.
e. Maintain default region settings unless specific requirements dictate otherwise.
f. Finalize by clicking 'Create secret'
Once these steps are done you can be assured that your private key is protected and isn’t accessible to everyone.
Connecting to your Github repository
Now that you have your Git keys it is necessary to add the public key on GitHub so as to connect it to your infrastructure on GCP. So log into your GitHub account move into your repository page and follow these steps:
a. Move to the Settings tab of your repository
c. In the sidebar, select 'Deploy Keys' and click 'Add deploy key'.
d. Provide a descriptive title and paste the contents of 'workingdir/id_github.pub'. This is your public key
e. Enable 'Allow write access'.
f. Confirm by clicking 'Add key'.
Once you have added the Git keys to the Secret manager and your GitHub repository Access key section you can continue and remove the local copies. This adds another level of security and makes sure nobody else is able to access your GitHub key. To do so run this on your cloud shell:
rm id_github*
Configuring Cloud Build Service Account Permissions
Now that you have the above set you need to make sure that the Service Account that you are using has access to the Secret Manager.
a. Navigate to the Cloud Build Settings page in Google Cloud Console.
b. Select the service account for your build operations.
c. Enable the 'Secret Manager Secret Assessor' role for this account.
Preparing Known Hosts for GitHub
The 'known_hosts' file is a critical component of SSH security, playing a vital role in preventing man-in-the-middle (MITM) attacks. Therefore, the final step is to set up your known hosts file.
We save the GitHub public key for SSH verification in the known_hosts file. Go ahead use this command and create a known_hosts file in the working directory
ssh-keyscan -t rsa github.com > known_hosts.github
Make sure to download the 'known_hosts.github' file to the appropriate location in the build environment, in this case your Github repository.
With the GitHub SSH keys properly configured and securely stored, the next critical step is to create your cloudbuild.yaml configuration file. This YAML file defines the series of steps Cloud Build will execute during the deployment process.
For deploying applications to Compute Engine instances via SSH, it's imperative to set up authentication keys with the appropriate access permissions. These keys will enable Cloud Build to securely push code and execute commands on your Compute Engine Managed Instance Groups (MIGs).
In the next section, we'll delve into the details of setting up these SSH keys for Compute Engine. This final piece will complete our Continuous Deployment (CD) pipeline, enabling automated deployments to Compute Engine MIGs via SSH.
Configuring SSH keys for secure access to Compute Engine instances
This step is crucial for ensuring that our Cloud Build processes can securely interact with our deployment targets. Let's walk through this process, addressing common pitfalls and best practices along the way.
1. Generating SSH Keys
Create a folder named ssh_keys on your Cloud Editor. Inside that, create a blank text file called id_rsa.txt. This is where your SSH keys will be stored: both public and private.
Let's start by generating the SSH keys. Replace the italics values in the command below and run it on your cloud shell.
ssh-keygen -t rsa -f ~/enter_path_to_id_rsa.txt -C your_username -b 2048
The addition of 2048 generates a 2048-bit RSA key pair, which offers a good balance of security and performance.
2. Enter into your instance through the shell through the following command. Now the changes and the directories of files you make will all be saved in your instance memory. Make sure that you have allotted enough memory during instance formation or MIG template formation.
gcloud compute ssh username@instance_name --zone instance_zone
3. Adding SSH Keys to Compute Engine Metadata
Once you have your key pair, you need to add the public key to your Compute Engine instance's metadata. This allows you to access the SSH on that particular instance.This can be done using the following gcloud command paste this on the:
gcloud compute instances add-metadata instance_name \
--metadata ssh-keys="username:$(location_of_public_key/id_rsa.pub)" \
--zone instance_zone \
--project project_id
Replace the name of the instance with your compute engine instance name, followed by your username, location of public key, zone in which the instance is created and finally your project id.
4. Configuring the Instance for SSH Access
Now that you have added the public key to your instance metadata, in order to access the instance you would need to add the private key in the authorized_keys file in the instance ssh folder. This private key is verified with your public key from the metadata to give access to the ssh and further processing.
On your Compute Engine instance paste the following commands to set up the authorized_keys file:
mkdir -p ~/.ssh
nano ~/.ssh/authorized_keys
The nano command opens an editor. Paste your key in this file and then save it accordingly.
Next, let's set up the correct permissions for the keys, paste these commands in the shell:
chmod 700 ~/.ssh
chmod 600 ~/.ssh/authorized_keys
These permissions are crucial for security - SSH will refuse to work if the permissions are too open.
5. Testing Your SSH Connection
Once you have executed all the above steps your SSH connection should be set. You can test your SSH connection using the verbose flag to diagnose any issues:
ssh -v -i ~/ssh_keys/id_rsa username@external_ip_of_instance
Diese Schritte führen zur Fertigstellung Ihres CD-Setups, und Sie können Ihren Code von GitHub nahtlos in Ihre Produktionsumgebung integrieren.
Bevor Sie vollständig startklar sind, stellen Sie sicher, dass Docker korrekt auf Ihrer Instanz installiert ist und läuft. Ein häufiges Problem bei der Arbeit mit Docker sind Authentifizierungsfehler.
HÄUFIGES PROBLEM
Wenn Sie beim Abrufen von Docker-Images Fehler wie 'Unauthenticated request' erhalten, müssen Sie möglicherweise die entsprechenden IAM-Rollen hinzufügen. Führen Sie dazu diesen Befehl aus:
gcloud projects add-iam-policy-binding project_id \
--member=serviceAccount:service_account_name\
--role=roles/artifactregistry.reader
Konfigurieren Sie Docker außerdem für die Authentifizierung mit GCR:
gcloud auth configure-docker gcr.io --quiet
Mit diesen Schritten ist Ihre Deployment-Pipeline zusammen mit der Continuous-Deployment-Pipeline einsatzbereit, und Sie können Updates direkt von GitHub nahtlos in Ihre Produktionsumgebung auf der Google Cloud Platform integrieren.
Es kann vorkommen, dass der gerade bereitgestellte Produktionscode trotz mehrfacher Überprüfung fehlschlägt und Sie zur vorherigen Version zurückkehren möchten. Dies lässt sich mit der Rollback-Methode beheben, bei der Sie zu einer früheren Version Ihres bereitgestellten Codes zurückkehren können. Dazu haben Sie eine Option über die Konsole, wo Sie ein Rollback auswählen können. Wenn Sie jedoch die Shell verwenden und den Vorgang dort ausführen möchten, folgen Sie diesem Befehl und ersetzen Sie ihn durch die korrekten Variablen.
gcloud deploy targets rollback TARGET_NAME \ --delivery-pipeline= PIPELINE_NAME \ --release= RELEASE_NAME \ --rollout-id= ROLLOUT_ID
Stellen Sie dabei sicher, dass die Bereitstellung von fehlerhaftem Code in der Produktion zu erheblichen Ausfallzeiten Ihrer Anwendung sowie zu Datenverlust führen kann. Vergewissern Sie sich daher, dass Ihr Code vollständig getestet ist und reibungslos unter Last läuft, bevor Sie ihn in die Produktion überführen.
Fazit
Die Bereitstellung von Anwendungen auf Google Cloud mit einer sicheren und automatisierten CD-Pipeline ist mehr als nur eine technische Errungenschaft – sie ist ein Schritt hin zu einer optimierten, effizienten Entwicklung. Durch die sorgfältige Konfiguration von SSH-Schlüsseln und die Nutzung von Git-Triggern gewährleisten Sie nicht nur die Integrität Ihres Bereitstellungsprozesses, sondern auch die Geschwindigkeit und Zuverlässigkeit Ihrer Updates. Dieser Ansatz eliminiert manuelle Fehler, reduziert den Betriebsaufwand und beschleunigt die Bereitstellung neuer Funktionen in der Produktion.
Während Sie Ihre Cloud-Infrastruktur weiter verfeinern, werden die Erkenntnisse aus der Einrichtung dieser Pipeline – wie die Absicherung von Anmeldeinformationen mit Secret Manager und die Optimierung Ihrer GitHub-Integration – als solides Fundament dienen. Mit diesem Setup halten Sie nicht nur mit der schnelllebigen Welt von DevOps Schritt; Sie übernehmen die Führung auf dem Weg in eine sicherere, automatisierte Zukunft.