00 min read
Hello, When starting the process of migrating servers from Digital Ocean to AWS. I choose AWS Application Migration Service after carefully reading the documentation to decide which AWS service to use for the migration.
Why I Selected the AWS Application Migration Service:
AWS Application Migration Service (MGN) is a highly automated lift-and-shift (rehost) solution that simplifies, expedites, and reduces the cost of migrating applications to AWS. It enables companies to lift-and-shift a large number of physical, virtual, or cloud servers without compatibility issues, performance disruption, or long cutover windows.
As per the Requirement of customers they want to clone their complete server as it is on AWS, so as MGN gives us Lift and Shift of everything we have on our servers I decide to go with it.
Moving to the Steps of Migration:
The Servers which are in the digital ocean they all are in the public subnet, so I have asked for the access of all the servers which I want to migrate. (If you don’t have access of source servers then share the replication agent download and installation link with your client)
1. Creating User:
I. As the First step you have to Login to AWS console-> go to the IAM-> create new user: MGNUSER->and add the permissions -> AWSApplicationMigrationAgentPolicy -> click create user
II. Then generate Access keys and Secret keys for the MGNUSER (we need these keys for creating source server in MGN.
2. Download and Installation of Replication Agent on Source
I. Navigate to Application Migration Console-> Go to Source Server-> Add server-> Select your OS type-> Enter Your MGNUSER Access key and Secret Key.
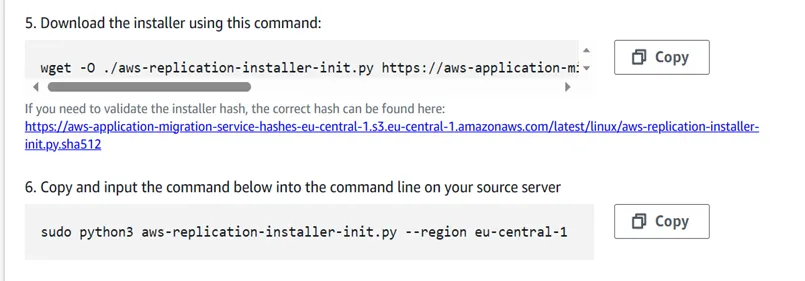
I. Then copy the replication download link and run it on source server.
II. Once downloaded, copy the replication installation agent link and run it on your source server.
III. It will take some time for the command line to appear on your source server (depending typically on network bandwidth and network connectivity between Digital Ocean and AWS). Keep your terminal open throughout this operation.
IV. Once the Process completed on your source server you can close your source terminal.
V. Note: The AWS Application Migration service did not support Ubuntu version 21
1. Configuration on AWS
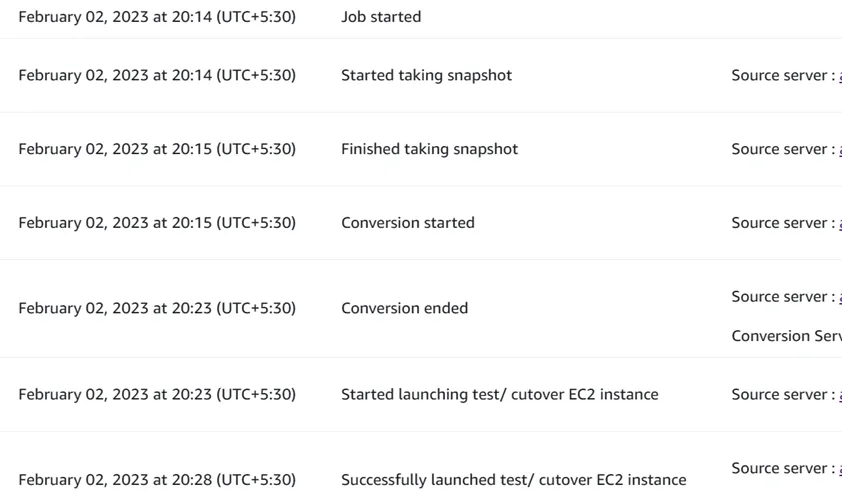
I. Go to Application Migration Service in AWS It is possible to observe that the new server has been built and is currently synchronizing (again, it is not required that you remain logged into your AWS account and continuously monitor the developments).
II. The continuing Synchronous procedure will not be impacted by your network connectivity loss or logging out of your AWS account.
III. The Synchronous process will be completed and marked as being ready for testing (the Synchronous process takes hours to complete depending on the size of data on source).
2. Launch Test Instance
I. Select your server-> go to the Launch Configuration-> mention the Network Configurations-> size of instance-> its VPC-> subnet
II. Click on Launch Test instance
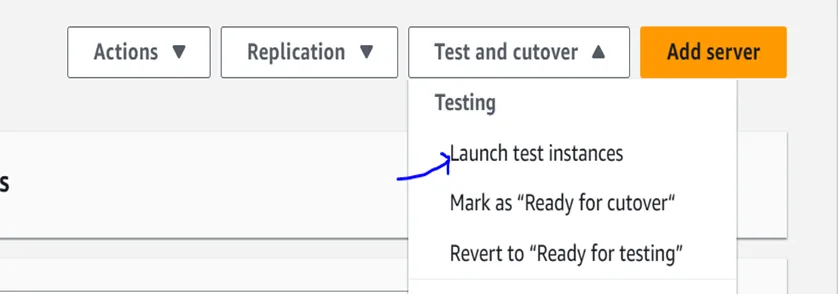
III. It will create the job Id which will track the complete process.
IV. Once the EC2 instance launched successfully you can see that instance in your console.
V. Test the Instance. If everything is good then mark it as revert for cutover.
Note: During the process the changes which you are performing on source that is digital ocean server will not automatically add to the Launched EC2 instance.
Example:
If I have 10 files on sources at the time of launching the instance and the instance launched in AWS.
Now that I’ve made changes on the digital ocean server, I’ve added one file there, making a total of 11 files.
But that will not reflect on my EC2 for that updated changes we have to Revert the instance back to testing and then Launch the test instance using same Launch template.
VI. Once test done Mark it as Ready for cutover.
1. Launch Cutover instance
Points to be noted before cutover:
Make a plan for cutover it should be in non-business hours
Don’t shutdown your source server before finalizing the cutover.
I. Select the Launch Template configuration, do the configurations.
II. Select Launch cutover Instances
III. The cutover job will be created, See the job progress
IV. Once the Instance Successfully Launched.
Note: It will Terminate your already Launched test instance and will Launch new Instance.
V. Click on Finalize Cutover
VI. Now you successfully migrated the Server from Digital Ocean to AWS
VII. Terminate your Digital Ocean server and start using the newly Migrated AWS Server.
Conclusion
If you have any questions about moving a server from Digital Ocean to AWS, I hope this blog will help. Check your OS version before moving, keep tabs on source updates before cutting the switch, choose a schedule for the switch, and follow the instructions provided. I hope this will save you time, money, and risk.
Migration of Servers from Digital Ocean to AWS
Hello, When starting the process of migrating servers from Digital Ocean to AWS. I choose AWS Application Migration Service after carefully reading the documentation to decide which AWS service to use for the migration.
Why I Selected the AWS Application Migration Service:
AWS Application Migration Service (MGN) is a highly automated lift-and-shift (rehost) solution that simplifies, expedites, and reduces the cost of migrating applications to AWS. It enables companies to lift-and-shift a large number of physical, virtual, or cloud servers without compatibility issues, performance disruption, or long cutover windows.
As per the Requirement of customers they want to clone their complete server as it is on AWS, so as MGN gives us Lift and Shift of everything we have on our servers I decide to go with it.
Moving to the Steps of Migration:
The Servers which are in the digital ocean they all are in the public subnet, so I have asked for the access of all the servers which I want to migrate. (If you don’t have access of source servers then share the replication agent download and installation link with your client)
1. Creating User:
I. As the First step you have to Login to AWS console-> go to the IAM-> create new user: MGNUSER->and add the permissions -> AWSApplicationMigrationAgentPolicy -> click create user
II. Then generate Access keys and Secret keys for the MGNUSER (we need these keys for creating source server in MGN.
2. Download and Installation of Replication Agent on Source
I. Navigate to Application Migration Console-> Go to Source Server-> Add server-> Select your OS type-> Enter Your MGNUSER Access key and Secret Key.
I. Then copy the replication download link and run it on source server.
II. Once downloaded, copy the replication installation agent link and run it on your source server.
III. It will take some time for the command line to appear on your source server (depending typically on network bandwidth and network connectivity between Digital Ocean and AWS). Keep your terminal open throughout this operation.
IV. Once the Process completed on your source server you can close your source terminal.
V. Note: The AWS Application Migration service did not support Ubuntu version 21
1. Configuration on AWS
I. Go to Application Migration Service in AWS It is possible to observe that the new server has been built and is currently synchronizing (again, it is not required that you remain logged into your AWS account and continuously monitor the developments).
II. The continuing Synchronous procedure will not be impacted by your network connectivity loss or logging out of your AWS account.
III. The Synchronous process will be completed and marked as being ready for testing (the Synchronous process takes hours to complete depending on the size of data on source).
2. Launch Test Instance
I. Select your server-> go to the Launch Configuration-> mention the Network Configurations-> size of instance-> its VPC-> subnet
II. Click on Launch Test instance
III. It will create the job Id which will track the complete process.
IV. Once the EC2 instance launched successfully you can see that instance in your console.
V. Test the Instance. If everything is good then mark it as revert for cutover.
Note: During the process the changes which you are performing on source that is digital ocean server will not automatically add to the Launched EC2 instance.
Example:
If I have 10 files on sources at the time of launching the instance and the instance launched in AWS.
Now that I’ve made changes on the digital ocean server, I’ve added one file there, making a total of 11 files.
But that will not reflect on my EC2 for that updated changes we have to Revert the instance back to testing and then Launch the test instance using same Launch template.
VI. Once test done Mark it as Ready for cutover.
1. Launch Cutover instance
Points to be noted before cutover:
Make a plan for cutover it should be in non-business hours
Don’t shutdown your source server before finalizing the cutover.
I. Select the Launch Template configuration, do the configurations.
II. Select Launch cutover Instances
III. The cutover job will be created, See the job progress
IV. Once the Instance Successfully Launched.
Note: It will Terminate your already Launched test instance and will Launch new Instance.
V. Click on Finalize Cutover
VI. Now you successfully migrated the Server from Digital Ocean to AWS
VII. Terminate your Digital Ocean server and start using the newly Migrated AWS Server.
Conclusion
If you have any questions about moving a server from Digital Ocean to AWS, I hope this blog will help. Check your OS version before moving, keep tabs on source updates before cutting the switch, choose a schedule for the switch, and follow the instructions provided. I hope this will save you time, money, and risk.