Resources
The latest industry news, interviews, technologies and resources.
Moving Beyond Dots on a Map: The Power of Smart Geo-Location in IoT Fleet Operations
The "Tracking Trap": Why GPS Alone is Not Enough
For years, fleet management was synonymous with simple GPS tracking. If you could see a vehicle's position on a map, you felt in control. But in the age of high-velocity logistics and stringent SLAs, seeing a "dot on a map" is no longer sufficient.
Raw GPS data is noisy. It drifts, it creates false alarms, and most importantly, it requires a human to watch the screen to make sense of it. Without smart processing, you aren't managing a fleet, you’re just watching a screen.
At Ankercloud, we believe the true value of location data lies in Smart Geo-Location Handling, the process of transforming raw coordinates into meaningful operational events.
From Location Data to Location Intelligence
The challenge with modern fleets isn't a lack of data; it's the "signal-to-noise" ratio. Vehicles transmit latitude, speed, and ignition status every few seconds. Smart IoT platforms take this stream and apply rule-driven, context-aware logic to answer the questions that actually matter:
- Is the vehicle in a restricted zone?
- How long has it been idling at the loading dock?
- Did it arrive at the school zone exactly on time?
By moving from passive tracking to Smart Control, fleet operators can stop monitoring maps and start managing exceptions.
Five Capabilities Redefining Fleet Efficiency
How does smart geo-location transform your daily operations?
1. Automated Trip Lifecycle Management
By defining Route Start and End Zones, the system automatically triggers trip logs. When a vehicle exits the depot, the "Route Active" state begins; when it returns, the trip analytics are finalized and archived without a single manual entry.
2. High-Precision Pickup & Drop Zones
Using radius and polygon-based Geo-fencing, the platform detects the exact moment a vehicle enters a delivery site. This triggers "Arrival" notifications for the customer and can even initiate secondary validation, such as BLE beacon scanning, to ensure the right cargo is in the right place.
3. Safety & Compliance via "Speed Zones"
Not all miles are equal. Smart systems monitor speed thresholds relative to the specific zone. If a vehicle exceeds a safety limit in a school area or a high-security warehouse yard, the system triggers an instant alert and updates the driver’s safety score.
4. False-Alert Suppression (Buffer Logic)
GPS signals often "drift" or "bounce" near the edges of a zone, leading to a flood of false entry/exit alerts. Smart geo-location handling uses Buffer Zones and historical context to verify a state change, ensuring your operators only receive alerts that are real.
5. Proactive Idle Monitoring
Idling is a silent killer of fuel efficiency. By monitoring Dwell-Time in non-operational zones, the platform identifies potential breakdowns or unauthorized breaks, allowing you to intervene before a small delay becomes an SLA breach.
Architecture of a Smart Fleet
The flow of intelligence is seamless, moving from the edge to the dashboard:
- Vehicle GPS Device: Transmits raw telemetry via MQTT/HTTP.
- IoT Platform Layer: Ingests coordinates and validates state.
- Geo-Fencing Engine: Applies business rules (speed, zones, time).
- Event Engine: Generates actionable alerts and historical logs.
- Operational Dashboard: Displays insights, not just dots.
The Business Impact: Real-World ROI
Implementing smart geo-location logic delivers more than just visibility; it delivers a better bottom line:
- Reduced Fuel Consumption: Through aggressive idle and route monitoring.
- Improved SLA Compliance: With automated arrival/departure timestamps.
- Enhanced Safety: By enforcing speed-control zones and restricted area monitoring.
- Lower Operational Friction: Reducing the need for manual map monitoring by up to 70%.
The Ankercloud Edge
As an AWS and GCP Premier Tier Partner, Ankercloud understands the complexities of global fleet operations. We specialize in building the "intelligence layer" that turns raw sensor data into high-stakes business outcomes.
Geo-location is no longer just about where your vehicles are; it’s about what they are doing for your business. Let us help you move from tracking to control.
Ready to turn your fleet's GPS data into operational intelligence? Contact Ankercloud today for a 1-houry strategy session on Smart Geo-Location.
Conversational IoT: How MCP-Driven AI is Redefining ThingsBoard Operations
The "Dashboard Fatigue" in Modern IoT
Modern IoT environments are incredibly talkative. Every second, they generate a mountain of telemetry, alarms, and metadata. Platforms like ThingsBoard have done a brilliant job of collecting and visualizing this data, but there is a hidden cost: Access.
Historically, if you wanted to extract a specific contextual insight—like analyzing a temperature anomaly over a 7-day period, you needed one of three things: deep platform familiarity, REST API scripting skills, or a custom-built dashboard. This creates an "operational gate" where only technical users can truly "speak" to the machines.
At Ankercloud, we believe the next evolution of Industry 4.0 isn't just about more data, it’s about Conversational Intelligence.
Introducing the ThingsBoard MCP Server
The game-changer in this space is the Model Context Protocol (MCP). By implementing a dedicated ThingsBoard MCP Server, we are layering a secure intelligence interface over your existing deployment.
This allows Large Language Models (LLMs) and AI agents (like Claude or Gemini) to interact directly with your ThingsBoard environment. You no longer need to navigate three different nested dashboards to find a fault; you simply ask the AI to find it for you.
Architecture Overview: The Intelligence Layer
The ThingsBoard MCP Server acts as the secure translator between human intent and machine data. Instead of manual API calls, the system follows a seamless, automated flow:
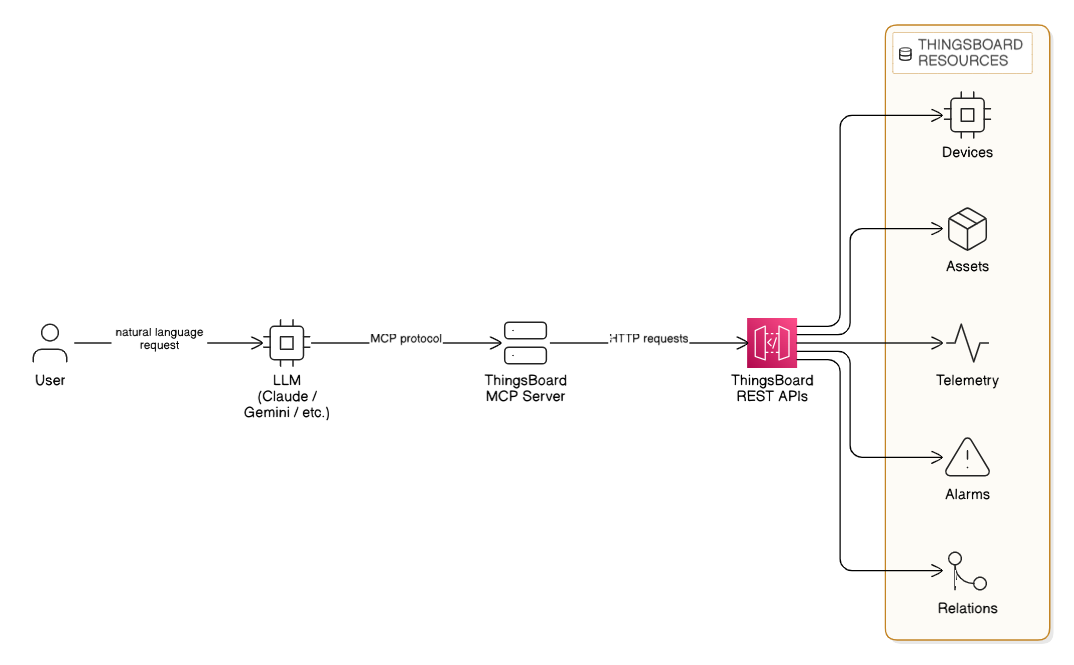
- User Request: A user makes a request in plain English (e.g., "Analyze Site-A telemetry").
- LLM Processing: An LLM (Claude, Gemini, etc.) interprets the intent.
- MCP Protocol: The LLM communicates with the ThingsBoard MCP Server via the MCP protocol.
- API Execution: The MCP server sends structured HTTP requests to the ThingsBoard REST APIs.
- Resource Retrieval: The system securely accesses specific ThingsBoard Resources including Devices, Assets, Telemetry, Alarms, and Entity Relations.
This architecture ensures that your data remains secure within your environment while becoming instantly accessible through conversation.
From "Scripting" to "Asking": A Paradigm Shift
Traditional IoT operations rely on manual exploration. The ThingsBoard MCP Server replaces that friction with natural language.
Imagine your operations team asking:
- "Analyze the vibration anomalies for Machine-12 over the last 48 hours."
- "Which Site-A sensors triggered critical alarms yesterday?"
- "Show me the relationship between this failed pump and its upstream power supply."
The MCP server translates these human requests into structured API calls, analyzes the results, and hands you back an actionable answer in seconds.
Four Core Capabilities of AI-Driven Operations
1. Intelligent Entity Management
AI agents can now navigate your assets, devices, and hierarchies through conversation. This makes administrative tasks like checking credentials or mapping new customers, faster and more intuitive for non-technical stakeholders.
2. Contextual Telemetry Interaction
Retrieving time-series data usually requires setting up specific widgets. With MCP, your AI agent can fetch aggregated data, compare latest values, and even update telemetry keys through a single chat interface. It turns "data points" into "data stories."
3. Rapid Alarm Intelligence
Root-cause analysis is often a race against the clock. AI agents can instantly filter alarms by severity, identify high-risk alert clusters, and cross-reference them with historical trends to tell you not just what happened, but why it might be happening again.
4. Navigating the Digital Twin
The true power of ThingsBoard lies in its entity relationships. The MCP server allows AI systems to traverse asset hierarchies and discover directional relations. This adds true contextual intelligence, understanding that a "High Heat" alarm on a motor is critical because that motor powers a "Priority-1" production line.
Why This Matters: The Business Impact
As an AWS and GCP Premier Tier Partner, Ankercloud sees a recurring theme among our global industrial clients: They want to move faster.
Introducing MCP-driven AI operations delivers measurable ROI by:
- Reducing Dashboard Dependency: Empowering managers to get insights without waiting for a technical report.
- Accelerating Root-Cause Analysis: Turning hours of manual data-combing into seconds of AI-assisted investigation.
- Improving Platform Adoption: Making advanced IoT data accessible to everyone in the organization, from the shop floor to the C-suite.
The Future is Autonomous
ThingsBoard has evolved from a monitoring platform into an Intelligent Operational Assistant. With the ThingsBoard MCP Server, your IoT platform is no longer just a collection of charts, it’s a conversational partner that understands your business rules and your machine data.
AI-driven IoT operations are no longer a future concept; they are a production-ready reality that simplifies the complex.
Ready to turn your IoT data into conversational intelligence? Contact Ankercloud today for a 1-hour strategy session on ThingsBoard MCP integration.
Beyond the Factory Floor: Why Your Smart Manufacturing Strategy Needs IoT and CRM Integration
The Intelligence Gap in Industry 4.0
For the past decade, the "Smart Factory" has been the holy grail of manufacturing. We have invested billions into automation, edge computing, and real-time monitoring. Our machines are talkative streaming runtime data, fault codes, and OEE metrics 24/7.
But here is the hard truth: If your factory floor doesn’t talk to your customer service team, your factory isn’t truly "smart."
A critical gap still exists in most industrial organizations. Operational data (OT) rarely connects directly to Customer Relationship Management (CRM) systems. This disconnect creates a "visibility wall" where the people responsible for the machines know exactly what’s happening, but the people responsible for the customers are left in the dark.
At Ankercloud, we believe the future of manufacturing isn't just defined by automation, it’s defined by connectivity and customer-centricity.
The High Cost of Siloed Systems
When factory operations and customer engagement live in separate silos, the business pays the price in friction:
- Service teams are reactive: They wait for a customer to call and complain about a breakdown that the machine reported hours ago.
- SLA risks are invisible: Production slowdowns go unnoticed by sales teams until a delivery is already late.
- Trust is eroded: Customers receive delayed information, leading to frustration and missed opportunities for proactive support.
A smart factory without a connected CRM is like a high-performance engine without a dashboard, it’s running fast, but you have no idea if you’re heading toward a breakdown or a finish line.
Closing the Loop: The IoT + CRM Architecture
Integrating an Industry 4.0 IoT platform with your CRM (like Salesforce, Dynamics 365, or HubSpot) creates a live reflection of your operations. Here is how we build that bridge:
- The Factory Layer: Sensors and PLCs collect machine telemetry (vibration, heat, cycles) in real-time via OPC-UA or MQTT gateways.
- The IoT Platform Layer: A platform like AWS IoT Core ingests this data, computes KPIs like OEE, and triggers alarms based on anomalies.
- The CRM Integration Layer: This is where the magic happens. Through secure APIs, factory events trigger automated workflows in your CRM.
Four Use Cases That Redefine the Customer Experience
How does this integration look in practice?
1. The "Self-Healing" Service Case
A machine on the floor throws a fault code. Instead of waiting for a manual check, the IoT platform automatically creates a service case in the CRM, assigns a technician, and orders the necessary replacement part before the production manager even finishes their coffee.
2. Proactive SLA Guardrails
If production throughput falls below a certain threshold on a custom order, the system detects a potential delay. The CRM instantly updates the account manager, allowing them to notify the customer proactively with a new timeline, preserving trust through transparency.
3. Predictive Maintenance as a Service
Using AI-driven analytics, we identify degradation trends. The CRM then automatically schedules preventive maintenance during a planned customer downtime window, ensuring the machine never reaches the point of actual failure.
4. Direct Customer Portals
Imagine a world where your customers don’t have to call for an update. They can log into a portal powered by your CRM and see the near real-time production status of their specific order, driven by live IoT data from the line.
The Business Impact: Turning Data into Revenue
Integrating IoT with CRM isn't just a technical upgrade; it's a financial one. Our clients see measurable ROI in:
- 80% faster issue response times: Moving from manual reporting to automated triggers.
- Higher Customer Lifetime Value (CLV): Transparency and proactivity build long-term loyalty.
- Optimized Service Revenue: Predictive maintenance allows you to sell "uptime" as a service rather than just parts and labor.
The Ankercloud Edge
As an AWS and GCP Premier Tier Partner, Ankercloud specializes in building the "connective tissue" of modern manufacturing. We don't just deploy sensors; we engineer end-to-end ecosystems where machine telemetry becomes a revenue-enabling asset.
Industry 4.0 is no longer just about making things better; it’s about serving people better. By making your factory "customer-aware," you aren't just building a smart factory, you’re building a connected, intelligent, and future-proof business.
Is your factory talking to your customers? Contact Ankercloud today for a 1-hour strategy session on IoT and CRM integration.
Quality Management in the AI Era: Building Trust and Compliance by Design
The Trust Test: Why Quality is the New Frontier in AI
When we talk about quality in AI, we're not just measuring accuracy; we're measuring trust. An AI model with 99% accuracy is useless or worse, dangerous if its decisions are biased, non-compliant, or can't be explained.
For enterprises leveraging AI in critical areas (from manufacturing quality control to financial risk assessment), a rigorous Quality Management system is non-negotiable. This process must cover the entire lifecycle, ensuring that the AI works fairly, securely, and safely - a concept often known as Responsible AI.
We break down the AI Quality Lifecycle into five essential stages, guaranteeing that quality is baked into every decision.
The 5 Stage AI Quality Lifecycle Framework
Quality assurance for AI systems must start long before the model is built and continue long after deployment:
1. Data Governance & Readiness
The model is only as good as the data it trains on. We focus on validation before training:
- Data Lineage & Labeling: Enforcing traceable protocols and dataset versioning.
- Bias Detection: Pre-model checks for data bias and noise to ensure representativeness across demographics or time segments.
- Secure Access: Enforcing anonymization and strict access controls from the outset.
2. Model Development & Validation
Building the model resiliently:
- Multi-Split Validation: Using cross-domain validation methods, not just random splits, to ensure the model performs reliably in varied real-world scenarios.
- Stress Testing: Rigorous testing on adversarial and out-of-distribution inputs to assess robustness.
- Evaluation Beyond Accuracy: Focusing on balanced fairness and robustness metrics, not just high accuracy scores.
3. Explainability & Documentation
If you can't explain it, you can't trust it. We prioritize transparency:
- Interpretable Techniques: Applying methods like SHAP and LIME to understand how the model made its decision.
- Model Cards: Generating comprehensive documentation that describes objectives, intended users, and, critically, model limitations.
- Traceable Logs: Maintaining clear logs for input features and versioned training artifacts for auditability.
4. Risk Assurance & Responsible AI Controls
This is the proactive safety net:
- Harm Assessment: Formal assessment of misuse risk (intentional and unintentional).
- Guardrail Policies: Defining non-negotiable guardrails for unacceptable use cases.
- Human-in-the-Loop (HITL): Implementing necessary approval gates for safety-critical or high-risk outcomes.
5. Deployment, Monitoring & Continuous Improvement
Quality demands perpetual vigilance:
- Continuous Monitoring: Real-time tracking of accuracy, model drift, latency, and hallucination rates in production.
- Safe Rollouts: Utilizing canary releases and shadow testing before full production deployment.
- Reproducibility: Implementing controlled retraining pipelines to ensure consistency and continuous compliance enforcement.
Cloud: The Backbone of Scalable, High-Quality AI
Attempting this level of governance and monitoring without hyperscale infrastructure is impossible. Cloud platforms like AWS and Google Cloud (GCP) are not just hosting providers; they are compliance enforcement engines.
Cloud Capabilities Powering Quality Management:
- ML Ops Pipelines: Automated, reproducible pipelines (using services like SageMaker or Vertex AI) guarantee consistent retraining and continuous improvement.
- Centralized Compute: High-performance compute and data lakes enable fast model testing and quality insights across global teams and diverse data sets.
- Auditability & Compliance: Tools like AWS CloudTrail / GCP Cloud Logging provide unalterable audit trails, while security controls (AWS KMS / GCP KMS, IAM) ensure private and regulated workloads are protected.
This ensures that the quality of AI outputs is backed by governance, spanning everything from software delivery to manufacturing IoT and customer interactions.
Ankercloud: Your Partner in Responsible AI Quality
Quality and Responsible AI are two sides of the same coin. A model with high accuracy but biased outcomes is a failure. We specialize in using cloud-native tools to enforce these principles:
- Bias Mitigation: Leveraging tools like AWS SageMaker Clarify and GCP Vertex Explainable AI to continuously track fairness and explainability.
- Continuous Governance: Integrating cloud security services for continuous compliance enforcement across your entire MLOps workflow.
Ready to move beyond basic accuracy and build AI that is high-quality, responsible, and trusted?
Partner with Ankercloud to achieve continuous, global scalable quality.
Beyond Dashboards: The Four Dimensions of Data Analysis for Manufacturing & Multi-Industries
The Intelligence Gap: Why Raw Data Isn't Enough
Every modern business - whether on a shop floor or in a financial trading room is drowning in data: sensor logs, transactions, sales records, and ERP entries. But how often does that raw data actually tell you what to do next?
Data Analysis bridges this gap. It's the essential process of converting raw operational, machine, supply chain, and enterprise data into tangible, actionable insights for improved productivity, quality, and decision-making. We use a combination of historical records and real-time streaming data from sources like IoT sensors, production logs, and sales systems to tell a complete story.
To truly understand that story, we rely on four core techniques that move us from simply documenting the past to confidently dictating the future.
The Four Core Techniques: Moving from 'What' to 'Do This'
Think of data analysis as a journey with increasing levels of intelligence:
- Descriptive Analytics (What Happened): This is your foundation. It answers: What are my current KPIs? We build dashboards showing OEE (Overall Equipment Effectiveness), defect percentage, and downtime trends. It’s the essential reporting layer.
- Diagnostic Analytics (Why It Happened): This is the root cause analysis (RCA). It answers: Why did that machine fail last week? We drill down into correlations, logs, and sensor data to find the precise factors that drove the outcome.
- Predictive Analytics (What Will Happen): This is where AI truly shines. It answers: Will this asset break in the next month? We use sophisticated time series models (like ARIMA or Prophet) to generate highly accurate failure predictions, demand forecasts, and churn probabilities.
- Prescriptive Analytics (What Should Be Done): This is the highest value. It answers: What is the optimal schedule to prevent that failure and meet demand? This combines predictive models with optimization engines (OR models) to recommend the exact action needed—such as optimal scheduling or smart pricing strategy.
Multi-Industry Use Cases: Solving Real Business Problems
The principles of advanced analytics apply everywhere, from the shop floor to the trading floor. We use the same architectural patterns—the Modern Data Stack and a Medallion Architecture—to transform different kinds of data into competitive advantage.
In Manufacturing
- Predictive Maintenance: Using ML models to analyze vibration, temperature, and load data from IoT sensors to predict machine breakdowns before they occur.
- Quality Analytics: Fusing Computer Vision systems with core analytics to detect defects, reduce scrap, and maintain consistent product quality.
- Supply Chain Optimization: Analyzing vendor risk scoring and lead time data to ensure stock-out prevention and precise production planning.
In Other Industries
- Fraud Detection (BFSI): Deploying anomaly and classification models that flag suspicious transactions in real-time, securing assets and reducing financial risk.
- Route Optimization (Logistics): Using GPS and route history data with optimization engines to recommend the most efficient routes and ETAs.
- Customer 360 (Retail/Telecom): Using clustering and churn models to segment customers, personalize retention strategies, and accurately forecast demand.
Ankercloud: Your Partner in Data Value
Moving from basic descriptive dashboards to autonomous prescriptive action requires expertise in cloud architecture, data science, and MLOps.
As an AWS and GCP Premier Partner, Ankercloud designs and deploys your end-to-end data platform on the world's leading cloud infrastructure. We ensure:
- Accuracy: We build robust Data Quality and Validation pipelines to ensure data freshness and consistency.
- Governance: We establish strict Cataloging & Metadata frameworks (using tools like Glue/Lake Formation) to provide controlled, logical access.
- Value: We focus on delivering tangible Prescriptive Analytics that result in better forecast accuracy, faster root cause fixing, and verifiable ROI.
Ready to stop asking "What happened?" and start knowing "What should we do?"
Partner with Ankercloud to unlock the full value of your enterprise data.
Data Agents: The Technical Architecture of Conversational Analysis on GCP
Conversational Analytics: Architecting the Data Agent for Enterprise Insight
The emergence of Data Agents is revolutionizing enterprise analytics. These systems are far more than just sophisticated chatbots; they are autonomous, goal-oriented entities designed to understand natural language requests, reason over complex data sources, and execute multi-step workflows to deliver precise, conversational insights. This capability, known as Conversational Analysis, transforms the way every user regardless of technical skill interacts with massive enterprise datasets.
This article dissects a robust, serverless architecture on Google Cloud Platform (GCP) for a Data Wise Agent App, providing a technical roadmap for building scalable and production-ready AI agents.
Core Architecture: The Serverless Engine

The solution is anchored by an elastic, serverless core that handles user traffic and orchestrates the agent's complex tasks, minimizing operational overhead.
Gateway and Scaling: The Front Door
- Traffic Management: Cloud Load Balancing sits at the perimeter, providing a single entry point, ensuring high availability, and seamlessly distributing incoming requests across the compute environment.
- Serverless Compute: The core application resides in Cloud Run. This fully managed platform runs the application as a stateless container, instantly scaling from zero instances to hundreds to meet any demand spike, offering unmatched cost efficiency and agility.
The Agent's Operating System and Mindset
The brain of the operation is the Data Wise Agent App, developed using a specialized framework: the Google ADK (Agent Development Kit).
- Role Definition & Tools: ADK is the foundational Python framework that allows the developer to define the agent's role and its available Tools. Tools are predefined functions (like executing a database query) that the agent can select and use to achieve its goal.
- Tool-Use and Reasoning: This framework enables the Large Language Model (LLM) to select the correct external function (Tool) based on the user's conversational query. This systematic approach—often called ReAct (Reasoning and Action)—is crucial for complex, multi-turn conversations where the agent remembers prior context (Session and Memory).
The Intelligence and Data Layer
This layer contains the powerful services the agent interacts with to execute its two primary functions: advanced reasoning and querying massive datasets.
Cognitive Engine: Reasoning and Planning
- Intelligence Source: Vertex AI provides the agent's intelligence, leveraging the gemini-2.5-pro model for its superior reasoning and complex instruction-following capabilities.
- Agentic Reasoning: When a user submits a query, the LLM analyzes the goal, decomposes it into smaller steps, and decides which of its tools to call. This deep reasoning ensures the agent systematically plans the correct sequence of actions against the data.
- Conversational Synthesis: After data retrieval, the LLM integrates the structured results from the database, applies conversational context, and synthesizes a concise, coherent, natural language response—the very essence of Conversational Analysis.
The Data Infrastructure: Source of Truth
The agent needs governed, performant access to enterprise data to fulfill its mission.
- BigQuery (Big Data Dataset): This is the serverless data warehouse used for massive-scale analytics. BigQuery provides the raw horsepower, executing ultra-fast SQL queries over petabytes of data using its massively parallel processing architecture.
- Generative SQL Translation: A core task is translating natural language into BigQuery's GoogleSQL dialect, acting as the ultimate Tool for the LLM.
- Dataplex (Data Catalog): This serves as the organization's unified data governance and metadata layer. The agent leverages the Data Catalog to understand the meaning and technical schema of the data it queries. This grounding process is critical for generating accurate SQL and minimizing hallucinations.
The Conversational Analysis Workflow
The complete process is a continuous loop of interpretation, execution, and synthesis, all handled in seconds:
- User Request: A natural language question is received by the Cloud Run backend.
- Intent & Plan: The Data Wise Agent App passes the request to Vertex AI (Gemini 2.5 Pro). The LLM, guided by the ADK framework and Dataplex metadata, generates a multi-step plan.
- Action (Tool Call): The plan executes the necessary Tool-Use, translating the natural language intent into a structured BigQuery SQL operation.
- Data Retrieval: BigQuery executes the query and returns the precise, raw analytical results.
- Synthesis & Response: The Gemini LLM integrates the raw data, applies conversational context, and synthesizes an accurate natural language answer, completing the Conversational Analysis and sending the response back to the user interface.
Ankercloud: Your Partner for Production-Ready Data Agents
Building this secure, high-performance architecture requires deep expertise in serverless containerization, advanced LLM orchestration, and BigQuery optimization.
- Architectural Expertise: We design and deploy the end-to-end serverless architecture, ensuring resilience, scalability via Cloud Run and Cloud Load Balancing, and optimal performance.
- ADK & LLM Fine-Tuning: We specialize in leveraging the Google ADK to define sophisticated agent roles and fine-tuning Vertex AI (Gemini) for superior domain-specific reasoning and precise SQL translation.
- Data Governance & Security: We integrate Dataplex and security policies to ensure the agent's operations are fully compliant, governed, and grounded in accurate enterprise context, ensuring the trust necessary for production deployment.
Ready to transform your static dashboards into dynamic, conversational insights?
Partner with Ankercloud to deploy your production-ready Data Agent.
Agentic AI Architecture: Building Autonomous, Multi-Cloud Workflows on AWS & GCP
The Technical Shift: From Monolithic Models to Autonomous Orchestration
Traditional Machine Learning (ML) focuses on predictive accuracy; Agentic AI focuses on autonomous action and complex problem-solving. Technically, this shift means moving away from a single model serving one function to orchestrating a team of specialized agents, each communicating and acting upon real-time data.
Building this requires a robust, cloud-native architecture capable of handling vast data flows, secure communication, and flexible compute resources across platforms like AWS and Google Cloud Platform (GCP).
Architectural Diagram Description
.png)
.png)
Visual Layout: A central layer labeled "Orchestration Core" connecting to left and right columns representing AWS and GCP services, and interacting with a bottom layer representing Enterprise Data.
1. Enterprise Data & Triggers (Bottom Layer):
- Data Sources: External APIs, Enterprise ERP (SAP/Salesforce), Data Lake (e.g., AWS S3 and GCP Cloud Storage).
- Triggers: User Input (via UI/Chat), AWS Lambda (Event Triggers), GCP Cloud Functions (Event Triggers).
2. The Orchestration Core (Center):
- Function: This layer manages the overall workflow, decision-making, and communication between specialized agents.
- Tools: AWS Step Functions / GCP Cloud Workflows (for sequential task management) and specialized Agent Supervisors (LLMs/Controllers) managing the Model Context Protocol.
3. Specialized Agents & Models (AWS Side - Left):
- Foundation Models (FM): Amazon Bedrock (access to Claude, Llama 3, Titan)
- Model Hosting: Amazon SageMaker Endpoints (Custom ML Models, Vision Agents)
- Tools: AWS Kendra (RAG/Knowledge Retrieval), AWS Lambda (Tool/Function Calling)
4. Specialized Agents & Models (GCP Side - Right):
- Foundation Models (FM): Google Vertex AI Model Garden (access to Gemini, Imagen)
- Model Hosting: GCP Vertex AI Endpoints (Custom ML Models, NLP Agents)
- Tools: GCP Cloud SQL / BigQuery (Data Integration), GCP Cloud Functions (Tool/Function Calling)
Key Technical Components and Function
1. The Autonomous Agent Core
Agentic AI relies on multi-agent systems, where specialized agents collaborate to solve complex problems:
- Foundation Models (FM): Leveraging managed services like AWS Bedrock and GCP Vertex AI Model Garden provides scalable, secure access to state-of-the-art LLMs (like Gemini) and GenAI models without the burden of full infrastructure management.
- Tool Calling / Function Invocation: Agents gain the ability to act by integrating with external APIs and enterprise systems. This is handled by Cloud Functions or Lambda Functions (e.g., AWS Lambda or GCP Cloud Functions) that translate the agent's decision into code execution (e.g., checking inventory in SAP).
- RAG (Retrieval-Augmented Generation): Critical for grounding agents in specific enterprise data, ensuring accuracy and avoiding hallucinations. Services like AWS Kendra or specialized embeddings stored in Vector Databases (like GCP Vertex AI Vector Search) power precise knowledge retrieval.
2. Multi-Cloud Orchestration for Resilience
Multi-cloud deployment provides resilience, avoids vendor lock-in, and optimizes compute costs (e.g., using specialized hardware available only on one provider).
- Workflow Management: Tools like AWS Step Functions or GCP Cloud Workflows are used to define the sequential logic of the multi-agent system (e.g., Task Agent $\rightarrow$ Validation Agent $\rightarrow$ Execution Agent).
- Data Consistency: Secure, consistent access to enterprise data is maintained via secure private links and unified data lakes leveraging both AWS S3 and GCP Cloud Storage.
- MLOps Pipeline: Continuous Integration/Continuous Delivery (CI/CD) pipelines ensure agents and their underlying models are constantly monitored, re-trained, and deployed automatically across both cloud environments.
Real-World Use Case: Enquiry-to-Execution Workflow
To illustrate the multi-cloud collaboration, consider the Enquiry-to-Execution Workflow where speed and data accuracy are critical:

How Ankercloud Accelerates Your Agentic Deployment
Deploying resilient, multi-cloud Agentic AI is highly complex, requiring expertise across multiple hyperscalers and MLOps practices.
- Multi-Cloud Expertise: As a Premier Partner for AWS and GCP, we architect unified data governance and security models that ensure seamless, compliant agent operation regardless of which cloud service is hosting the model or data.
- Accelerated Deployment: We utilize pre-built, production-ready MLOps templates and orchestration frameworks specifically designed for multi-agent systems, drastically cutting time-to-market.
- Cost Optimization: We design the architecture to strategically leverage the most cost-efficient compute (e.g., specialized GPUs) or managed services available on either AWS or GCP for each task.
Ready to transition your proof-of-concept into a production-ready autonomous workflow?
Partner with Ankercloud to secure and scale your multi-cloud Agentic AI architecture.
IoT in Manufacturing: Powering the Smart Factory and Industry 4.0
The Factory of the Future: Your Digital Advantage is Now
Manufacturing is no stranger to revolution, but the current shift is fundamentally different. It's not just about faster machines; it's about intelligent data. The integration of the Internet of Things (IoT) is reshaping how industries operate, paving the way for the era of Smart Manufacturing and Industry 4.0.
IoT acts as the key enabler, bridging the physical world of machinery and assets with the digital world of software and analytics. By connecting machines, systems, and people through intelligent data exchange, IoT transforms factories into dynamic, responsive environments capable of real-time decision-making, predictive insights, and continuous improvement.
IoT: The Engine Behind Industry 4.0 Transformation
The Smart Manufacturing Vision hinges entirely on seamless connectivity. IoT creates a connected ecosystem across your entire operation, offering end-to-end visibility that was previously impossible.
Key Pillars of the IoT-Driven Smart Factory
- Smart Factory Connectivity: IoT provides the nervous system for your factory. It connects every piece of equipment, system, and sensor, creating agile and responsive factory operations with complete, real-time visibility across production environments and supply chains.
- Efficiency & Productivity: IoT supports deep automation, allowing for real-time process monitoring and data-driven optimization. This directly enhances productivity and operational performance by eliminating guesswork and tuning processes continuously.
- Integration with Cloud, AI & Analytics: The true power lies in the fusion. Combining IoT data streams with powerful cloud platforms, artificial intelligence (AI), and machine learning creates intelligent, adaptive, and self-optimizing production systems that learn and adjust without human intervention.
Driving Measurable ROI: The Core Benefits of Connected Assets
Adopting IoT delivers tangible benefits that hit your bottom line, transforming traditional reactive maintenance and quality control into proactive, intelligent operations.
Predictive Maintenance: Zero Unplanned Downtime
IoT sensors constantly monitor the health of critical assets—vibration, temperature, pressure, and sound. IoT-driven analytics help you prevent equipment failures, minimize costly unplanned downtime, and significantly extend the lifecycle of your most valuable machinery. You fix problems before they happen.
Quality & Traceability: Guaranteeing Excellence
Continuous data collection through IoT enables higher product quality standards. By monitoring conditions at every stage, you can achieve early defect detection and maintain complete traceability from raw materials to finished goods—a crucial capability for regulatory compliance and customer trust.
Sustainability: A Greener Production Footprint
IoT contributes directly to sustainable manufacturing goals. By giving you granular data on consumption, you can identify and reduce waste, optimize resource and energy consumption, and support environmentally conscious production practices, aligning your operations with modern ESG mandates.
Human Impact: Safety and Collaboration
IoT is improving the work environment. It enhances workplace safety with connected wearables and automated safety alerts. It also boosts collaboration by enabling remote monitoring capabilities, allowing specialists to diagnose and assist globally without needing to be physically present.
Ankercloud: Your Partner for the Industry 4.0 Journey
Moving to a Smart Factory requires more than just installing sensors; it demands a robust, secure, and scalable cloud architecture ready for massive data ingestion and AI processing.
At Ankercloud, we design the full IoT solution lifecycle to maximize your business value:
- Resilient Data Pipelines: We engineer high-capacity data pipelines for seamless ingestion, processing, and storage of real-time sensor data at scale.
- Interactive Dashboards & Alerts: We build interactive dashboards for live operational insights and implement automated alerting and notification systems to ensure rapid incident response.
- Mobile Accessibility: Our solutions are mobile-enabled to keep remote teams, site managers, and maintenance crews informed and actionable on the go.
- KPI and Performance Modules: We translate raw data into measurable improvements, defining KPIs and performance modules that clearly track gains in productivity and efficiency.
- Enterprise Integration: To maximize ROI visibility, we integrate seamlessly with existing enterprise systems (e.g., ERP, CRM, SCADA) enabling real-time ROI visibility, cost-performance analysis, and strategic decision-making across production and operations.
Ready to connect your assets and unlock the power of real-time intelligence?
Partner with Ankercloud to accelerate your Industry 4.0 transformation.
Ethical Governance and Regulatory Compliance Solutions for Agentic AI
The Governance Imperative: Building Trust in Autonomous AI
The power of Agentic AI autonomous systems that make decisions and execute complex workflows comes with profound responsibility. For enterprises, deploying multi-agent systems requires a governance framework that moves beyond traditional model monitoring. It demands assurance that every autonomous action is transparent, fair, and legally compliant.
At Ankercloud, we provide comprehensive Agentic AI solutions designed to ensure ethical governance and regulatory compliance across these autonomous systems. Our framework integrates human oversight, intelligent monitoring, and policy-driven automation, empowering organizations to deploy AI responsibly while maintaining transparency, fairness, and accountability at every stage of the agentic workflow.
1. Ethical Governance Framework: Intelligence Embedded
Our governance model doesn't just review decisions; it embeds ethical intelligence directly into the fabric of agent workflows. This ensures that responsible principles are non-negotiable components of every autonomous action.
- Transparency & Explainability: Each agent records its decision logic and context, creating a clear audit trail. This ensures that every outcome, whether automated or escalated, is fully auditable for human review.
- Accountability: Supervisory agents monitor actions and escalate decisions requiring human validation. This creates a clear line of shared responsibility between the human team and the AI system.
- Fairness & Bias Mitigation: We implement continuous fairness assessments to detect and correct biases through automated bias-reporting agents and regular retraining cycles, ensuring equitable outcomes.
- Privacy Protection: Robust data governance policies enforce anonymization, secure transmission, and the principle of minimal data exposure during all inter-agent communication.
2. Regulatory Compliance Management: Global Legal Alignment
Navigating the fragmented global landscape of AI regulation is complex. Our solution simplifies this by building compliance into the core architecture, making your AI operations future-ready.
- Global Legal Alignment: Our Compliance agents ensure adherence to critical international standards, including GDPR, the EU AI Act, HIPAA, and ethical guidelines like those from the IEEE.
- Automated Policy Enforcement: Intelligent rule engines validate compliance in real time during key stages: data ingestion, model training, deployment, and post-production monitoring.
- Comprehensive Auditability: We maintain version-controlled logs and digital compliance dashboards, providing full visibility into model updates, decision outcomes, and risk assessments necessary for external audits.
3. Agentic Workflow Architecture: Governance as a Service
In our multi-agent ecosystem, governance is integrated directly into task execution through specialized, collaborative agents.
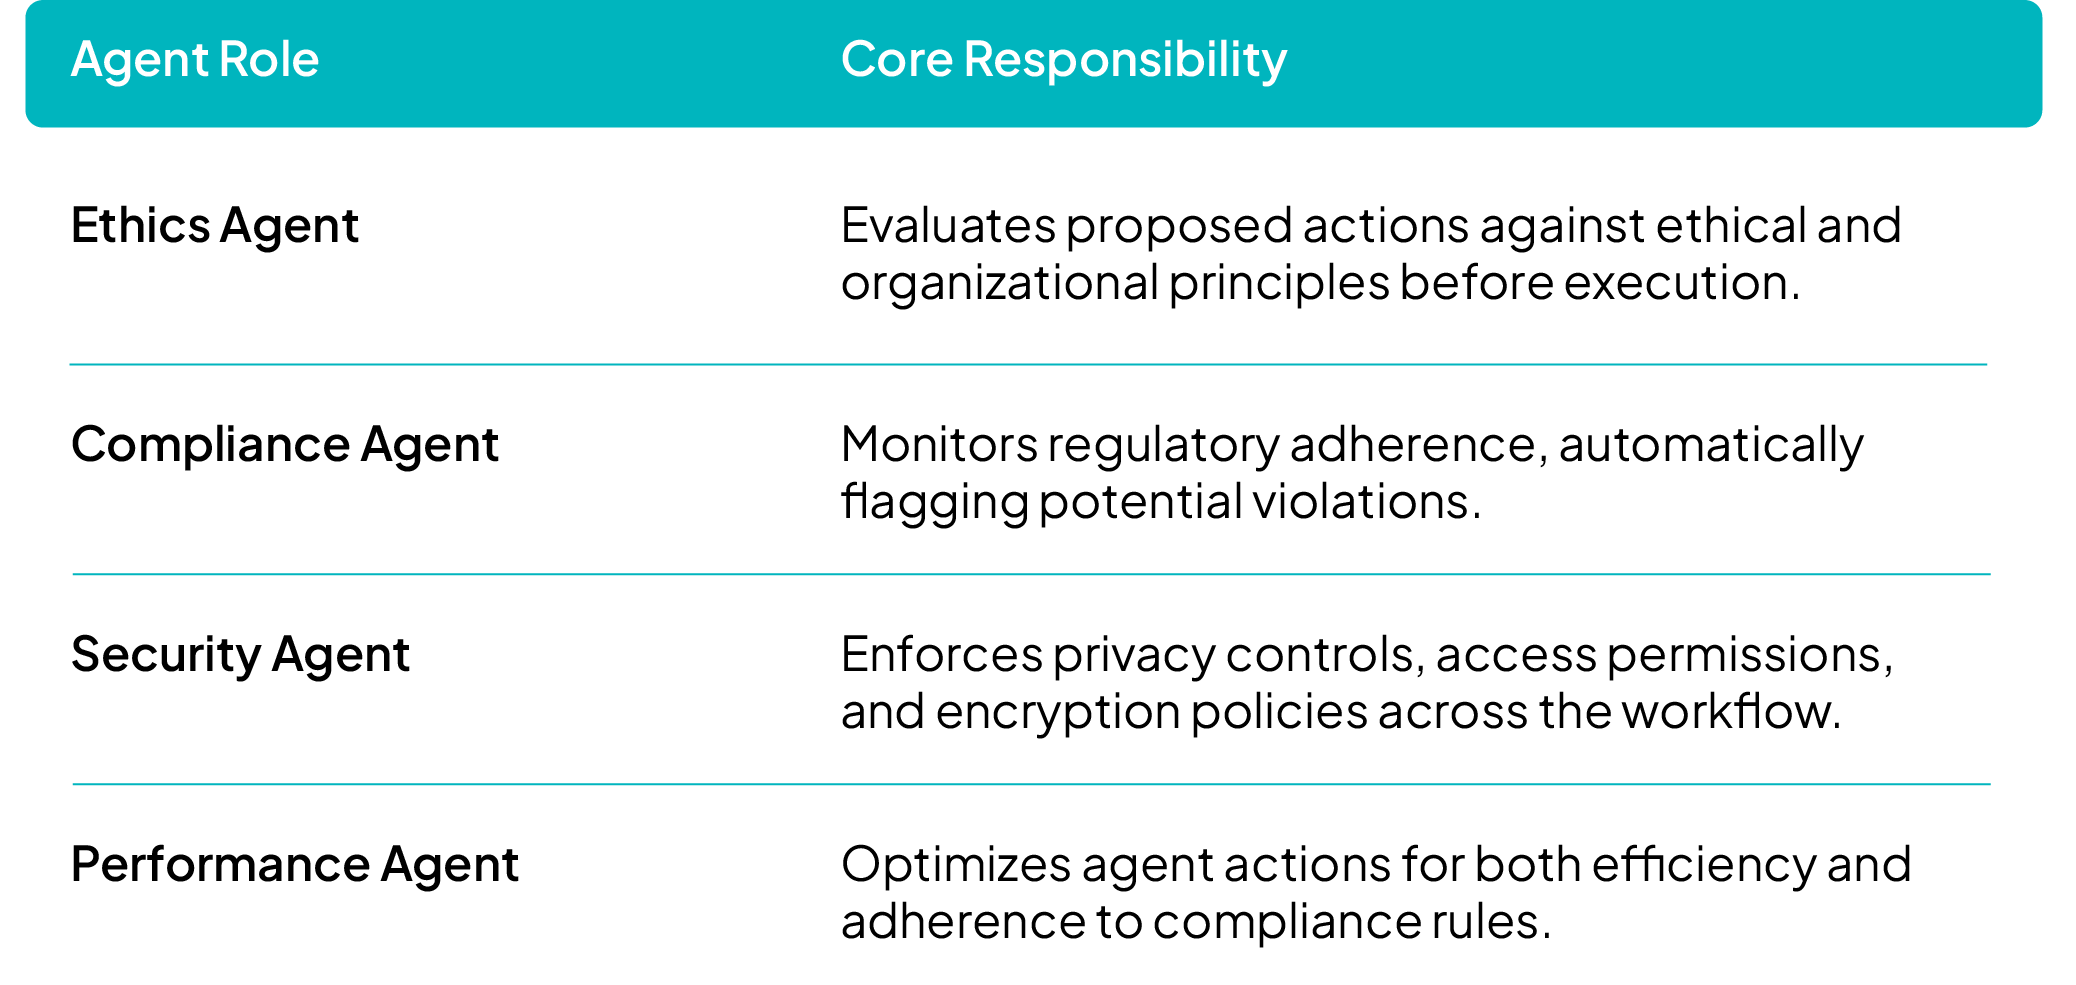
This architecture utilizes parallel processing to simultaneously evaluate ethics, compliance, and performance, ensuring that ethical clearance is a prerequisite for any task deployment.
4. Continuous Oversight & Improvement
To sustain compliance and ethical integrity in a constantly evolving environment, our systems feature ongoing monitoring and dynamic policy adaptation:
- Feedback Loops: Agents continuously self-assess and report ethical or regulatory anomalies for immediate review.
- Human-in-the-Loop Governance: Critical actions, high-impact decisions, and flagged cases are escalated to human reviewers, ensuring human judgment is applied where necessary.
- Adaptive Compliance Learning: Our systems are designed to evolve with new laws, standards, and enterprise governance frameworks through automated policy updates and model retraining.
Key Benefits
By partnering with Ankercloud, you gain:
- End-to-end ethical and regulatory assurance across multi-agent environments.
- Enhanced trust, transparency, and accountability in AI-driven decision-making.
- Real-time compliance validation through automated governance agents.
- A scalable, future-ready governance model adaptable to changing global AI regulations.
Ready to deploy autonomous AI with confidence and integrity?
Partner with Ankercloud to secure the ethical future of your Agentic AI systems.
Please Type Other Keywords
The Ankercloud Team loves to listen